
Main Courses
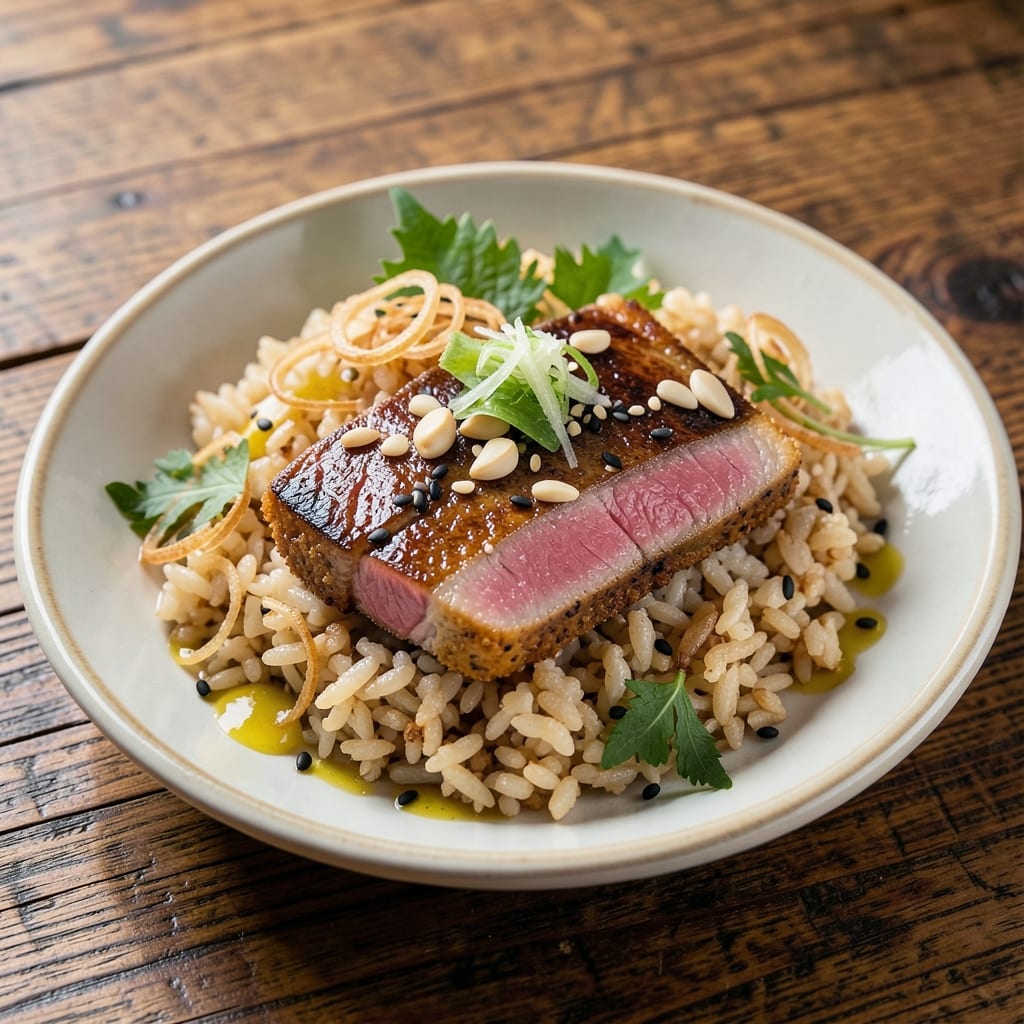
This ahi tuna crispy rice recipe transforms simple ingredients into a restaurant-worthy dish that balances crispy texture with delicate, silky fish. The secret lies in perfectly seared sushi-grade tuna paired with aromatic fried rice that stays tender yet develops a satisfying crunch from toasted sesame seeds and shallots. I developed this recipe after years of experimenting with Japanese home-style cooking, and it consistently delivers that perfect contrast of textures and flavors.
What makes this dish truly special is the technique: the tuna is seared just until the center remains cool and tender, while the rice is fried in batches to maintain its individual grains and develop that coveted crispiness. The combination of ginger, garlic, and soy in the rice adds depth, while the sesame crust on the tuna provides a nutty crunch that complements the fish's natural sweetness. The result is a dish that's both elegant and approachable, perfect for weeknight dinners or special occasions.
By the time you finish plating, you'll have a dish that looks as impressive as it tastes—golden-brown tuna resting on a bed of crispy rice, garnished with fresh herbs and a drizzle of sesame oil. The aroma alone will have everyone at the table anticipating the first bite, and the balance of flavors ensures each component shines without overpowering the others. This recipe proves that you don't need a sushi chef's skills to create a dish that feels like a high-end restaurant experience.
The best part? It's completely pescatarian-friendly and highlights the natural quality of the tuna. Whether you're serving this for a date night or a casual family meal, the combination of textures and flavors will leave a lasting impression. Let's get started on creating this dish that marries crispy perfection with silky elegance.
Ingredients for ahi tuna crispy rice
Crispy textures meet delicate fish in this restaurant-quality dish—just 15 ingredients needed.
| Ingredient | Amount | Notes |
|---|---|---|
| Sushi-Grade Ahi Tuna 🐟 | 1 ½ lb | Center-cut for best texture |
| Japanese Short-Grain Rice 🍚 | 2 cups | Uncooked, sushi rice preferred |
| Sesame Seeds 🥜 | ½ cup | White or black, toasted |
| Shallots 🧅 | 3 whole | Finely minced, not sliced |
| Fresh Ginger 🌿 | 2 tbsp | Finely grated, organic preferred |
| Garlic Cloves 🧄 | 4 cloves | Minced, not pressed |
| Soy Sauce 🍶 | ¼ cup | Japanese tamari preferred |
| Sesame Oil 🫒 | 2 tbsp | Toasted, not flavored |
| Vegetable Oil 🫒 | ½ cup | High smoke point, like avocado |
| Eggs 🥚 | 2 whole | Room temperature, beaten |
| Green Onions 🧅 | 4 whole | Thinly sliced, for garnish |
| Rice Vinegar 🍶 | 2 tbsp | Seasoned preferred |
| Salt 🧂 | 1 ½ tsp | Kosher salt, Diamond Crystal |
| Black Pepper 🌶️ | ½ tsp | Freshly cracked |
| Mirin 🍶 | 1 tbsp | Sweet cooking wine |
The tuna makes or breaks this dish, so sushi-grade is non-negotiable. Look for center-cut pieces at Whole Foods or specialty seafood markets—they'll have that perfect balance of fat and lean. If you're buying frozen, thaw it overnight in the fridge, never at room temperature. The rice should be Japanese short-grain—Koshihikari if you can find it. Fresh ginger and garlic are worth the extra cost here—they make all the difference in flavor. I always grab the organic ginger at Trader Joe's because it's consistently fresh.
No sesame seeds? Toasted peanuts or crushed pistachios add a similar crunch, though the flavor won't be identical. Short on shallots? Extra-fine onion powder at half the amount works in a pinch. The eggs are crucial for binding the sesame crust—room temperature eggs mix better, so take them out 30 minutes before using. For the rice, if you can't find Japanese short-grain, jasmine rice works but won't be as sticky. The mirin adds that perfect sweetness—substitute 1 tsp sugar + 1 tsp water if you're out, but the dish won't be quite the same.
This dish tastes even better the next day—the flavors meld beautifully. Store the tuna and rice separately in airtight containers for 2 days max in the fridge. The sesame crust stays crispy for 1 day if kept dry. For longer storage, freeze the cooked rice for up to 3 months—just reheat gently with a splash of water. The tuna? Eat it fresh or freeze it for 2 months. I always make extra rice because it disappears fast—perfect for fried rice the next day.
Why You'll Love This Recipe
- One-Pan Magic: I swear by this recipe when I’m too tired for fancy cooking—just sear the tuna, crisp the rice, and toss it all together. No chopping boards, no extra pots, just one sheet pan and a spatula. The rice gets that perfect golden crunch while the tuna stays juicy, and honestly, the cleanup is over in two minutes.
- Umami Bomb: That first bite? The crispy rice soaks up the tuna’s rich flavor while the ginger and shallots add this bright, zesty kick. Between us, the sesame seeds on top give it this nutty crunch that makes it taste like a restaurant dish—even if I’m wearing pajamas while making it.
- Weeknight or Weekend: Make it for a lazy Tuesday dinner or bring it to a potluck—this dish works everywhere. The rice stays crispy even when reheated, so it’s my go-to for meal prep. Plus, my picky-eating friend actually finishes her plate, which is basically a miracle.
- Budget Luxury: Sushi-grade tuna feels fancy, but you’re using way less than a full steak, and the rest of the ingredients are pantry staples. I’ll be real: it’s the kind of dish that makes you feel special without breaking the bank. Leftovers? They’re even better the next day—just a quick toast in the oven to revive the crunch.
Step-by-step instructions for ahi tuna crispy rice
Here's how to create that perfect balance of crunchy sesame crust and tender rice—every bite is pure magic!
👨🍳 Step 1: Prepare the Crispy Rice Base
First, rinse the 2 cups Japanese Short-Grain Rice in a fine-mesh strainer under cold water until the water runs clear. This removes excess starch and prevents gummy rice. Drain well and transfer to a bowl with 1.5 tsp salt, 1 tbsp mirin, and 2 tbsp rice vinegar. Mix gently to coat the grains evenly. Let it sit for 10 minutes while you prep the rest.
In a separate bowl, whisk together 2 whole Eggs and 2 tbsp sesame oil until smooth. This egg wash will create a golden crust on the rice. Keep it ready—it needs to be used immediately for best results. Here's the thing—don't skip the mirin or rice vinegar. They add that perfect balance of sweetness and tang that makes this dish shine.
🍳 Step 2: Cook the Rice to Perfect Texture
Heat 0.5 cup vegetable oil in a large skillet over medium-high heat. Add the marinated rice in an even layer, spreading it out so the pieces don't overlap. Cook undisturbed for 3-4 minutes until the bottom develops a golden crust. This is your crispy foundation—don't rush it!
Carefully flip the rice using a spatula and cook another 3-4 minutes until evenly golden. Remove from heat and transfer to a plate. Immediately toss with 0.5 cup sesame seeds to coat completely. These seeds will give your dish that irresistible crunch. Work quickly—the rice will continue cooking from residual heat, so don't let it sit too long.
🔥 Step 3: Create the Ahi Tuna Crust
While the rice cooks, prepare the tuna crust. In a small bowl, mix 0.25 cup soy sauce, 2 tbsp sesame oil, 2 tbsp fresh ginger, 4 minced garlic cloves, and 3 minced shallots. This marinade will infuse the tuna with incredible flavor. Cut the 1.5 lb sushi-grade ahi tuna into 4 equal portions (about 6-ounce each) and coat each piece thoroughly with the marinade.
Roll each tuna portion in the 0.5 cup sesame seeds until completely covered. Press gently to help the seeds adhere. Here's where it gets fun—the sesame seeds will create that perfect crunchy exterior while keeping the inside silky. Let the tuna-coated pieces sit for 5 minutes while you prep the final elements.
🥘 Step 4: Assemble and Finish
Heat 2 tablespoons vegetable oil in a clean skillet over medium-high heat. Add the tuna pieces and cook for 2-3 minutes per side until the sesame crust is deep golden brown and crispy. You'll know it's ready when you see those beautiful caramelized sesame clusters forming. Remove from heat and set aside.
To serve, place 1 cup crispy rice on each plate, top with a tuna piece, and garnish with 1 whole sliced green onion. Drizzle with any remaining marinade from the pan for extra flavor. The contrast of the warm, crispy rice with the silky tuna is what makes this dish truly special. Serve immediately while everything is at its peak texture and temperature!
Pro Tips For Making Ahi Tuna Crispy Rice
- CRISP THE TUNA RIGHT: Sear the ahi tuna slices in a screaming-hot pan for exactly 30 seconds per side—no more, no less. I used to walk away too soon, and the outside would stay cold while the inside overcooked. High heat builds that crispy crust without turning the center into rubber.
- SLICE GINGER THIN: Use a mandoline or sharp knife to shave ginger into paper-thin strips, not chunks. The flavor melts into the rice better, and you won’t end up with chewy bits that make the dish feel heavy. (Yes, it’s tedious, but trust me on this.)
- DON’T SKIP THE RICE REST: Spread the cooked rice on a tray and let it cool completely before mixing with the tuna. Warm rice turns mushy when tossed with oil and sesame seeds. I learned this after my first batch looked like a sad, gloppy pile.
- TOAST SESAME SEEDS LOW: Dry-toast the sesame seeds in a pan over medium-low heat for 1-2 minutes, stirring constantly. Burn them, and they’ll taste bitter; skip it, and they’ll just scatter like confetti. A few seconds of patience makes all the difference in flavor and texture.
Common mistakes when making perfect results
Overcooking the Tuna
This is the #1 mistake I see—cooking the tuna until it's fully opaque. Ahi tuna should be medium-rare at most, with a warm center that's just starting to pink. Overcooking ruins the delicate texture and turns it tough. Use a meat thermometer and pull it at 125°F internal temperature—that's perfect. I always test the thickest part to ensure even doneness. 🔥
Skipping the Resting Time
After searing, let the tuna rest for 2-3 minutes before serving. This allows the juices to redistribute, keeping every bite moist. I've seen people cut into it immediately and end up with dry, stringy fish. Trust the process—those few minutes make all the difference in texture.
Uneven Rice Cooking
Trying to cook all the rice at once in a single layer? Big mistake. The rice needs to be in small batches so it gets properly crispy on all sides. I cook mine in 2 batches of 1 cup each—this ensures even browning without steaming. Also, don't stir the rice while cooking—let it develop that golden crust!
Using Old Sesame Seeds
Fresh, toasted sesame seeds are non-negotiable for that authentic crunch. If your seeds are stale or untoasted, they'll turn mushy instead of crispy. Toast your seeds in a dry pan over medium heat for 2-3 minutes until fragrant before using. I keep a small jar of toasted seeds on hand specifically for this dish.
Overcrowding the Pan
When cooking the crispy rice, don't pile it too high in the pan. The rice needs space to crisp up properly—overcrowding steams it instead of browning. Spread the rice in an even layer, about ½ inch thick. I use a 12-inch cast-iron skillet for this recipe, which gives me plenty of room to work.
Neglecting the Marinade
Some people skip marinating the tuna or use just soy sauce—this is a flavor disaster. The combination of soy sauce, sesame oil, ginger, garlic, and shallots creates a symphony of flavors that penetrates the fish. Let the tuna marinate for at least 10 minutes (no longer than 30 minutes to prevent over-marinating). I always taste a tiny bit of the marinade before applying it to ensure the balance is right. 💡
Nutrition facts
Frequently asked questions
Can I substitute regular rice for Japanese short-grain rice?
While you can use jasmine rice in a pinch, Japanese short-grain rice is ideal because it stays sticky yet crispy when fried. Regular long-grain rice will turn out drier and less cohesive. If you must substitute, use 1 cup jasmine rice plus 1 extra tablespoon water during cooking to compensate for its lower starch content.
How do I know when the tuna is cooked perfectly?
The tuna should reach 125°F internal temperature and have a warm center that's just starting to turn pink (not fully opaque). For best results, use a meat thermometer. If you don't have one, cut into the thickest part—it should feel slightly cool to the touch with just a hint of resistance.
Can I make this recipe ahead of time?
Yes! Cook the crispy rice up to 1 day ahead and store it in an airtight container. Reheat in a dry skillet over medium heat for 2-3 minutes to restore crispiness. The tuna is best served fresh, but you can marinate and coat it 2 hours ahead—just sear it immediately before serving.
What's the best way to store leftovers?
Store the tuna and rice separately in airtight containers. The crispy rice keeps well for 2 days in the fridge, while the tuna should be eaten within 1 day for best texture. For longer storage, freeze the rice (up to 3 months)—thaw and reheat gently with a splash of water.
Why does my sesame crust turn greasy instead of crispy?
This usually happens from overcrowding the pan or using too much oil. Keep the sesame seeds fresh and toast them lightly before using. Also, ensure your oil is at medium-high heat—if it's too cool, the crust won't crisp. Cook in small batches for even browning.