
Side Dishes
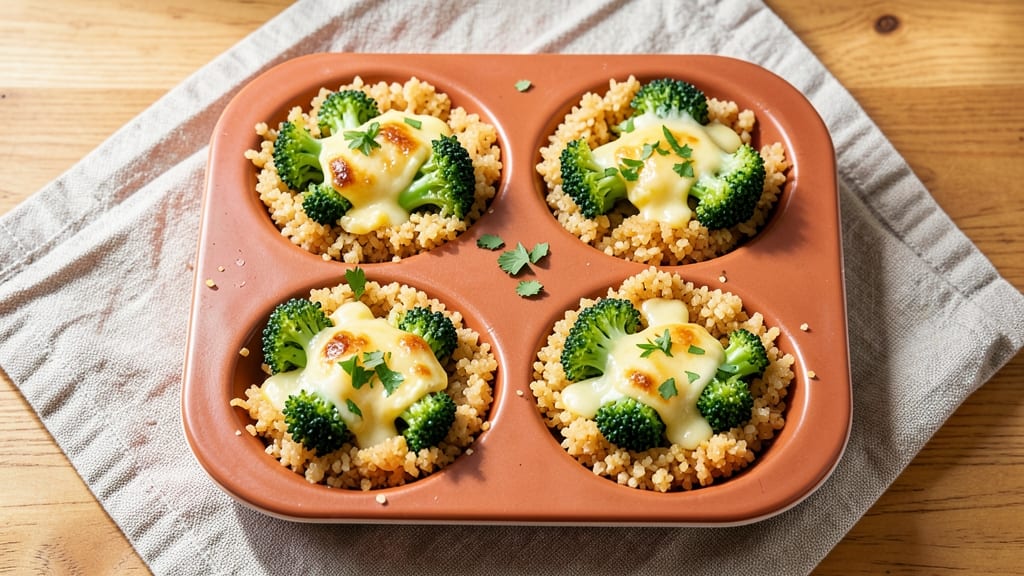
This broccoli rice cups recipe transforms simple ingredients into crispy-topped, handheld bites perfect for meal prep or snacking. The secret lies in baking the cups until golden and crunchy—no soggy tops here.
I developed this vegetarian-friendly version after realizing how much my family loved crispy textures with their meals, and it’s become a weekly staple.
What makes these cups special is their versatility: pack them for lunches, serve as a side dish, or enjoy them as a light dinner. The broccoli adds a vibrant green color and nutritious boost, while the rice base holds everything together.
Top with cheese or herbs for extra flavor, and you’ll have a dish that’s as satisfying as it is easy to prepare.
Ingredients for broccoli rice cups
Simple ingredients that pack flavor and texture into crispy, handheld bites.
| Ingredient | Amount | Notes |
|---|---|---|
| White Rice 🍚 | 1 cup | Uncooked, long-grain preferred |
| Broccoli Florets 🥦 | 2 cups | Fresh, finely chopped (about 4 oz) |
| Eggs 🥚 | 2 whole | Large, beaten for binding |
| Shredded Cheese 🧀 | 1 ½ cups | Mozzarella or cheddar blend |
| Panko Breadcrumbs 🍞 | ½ cup | For crispy topping |
| Fresh Parsley 🌿 | ¼ cup | Chopped, for garnish |
| Garlic Cloves 🧄 | 2 cloves | Minced for flavor |
| Olive Oil 🫒 | ¼ cup | For greasing cups |
| Salt 🧂 | ½ tsp | Kosher or sea salt |
| Black Pepper 🌶️ | ¼ tsp | Freshly ground |
| Vegetable Broth 💧 | ½ cup | Low-sodium for cooking rice |
| Butter 🧈 | 1 tbsp | Unsalted, for rice cooking |
The rice is the base, so don't skimp on quality—jasmine or basmati works best for that light texture. Broccoli? Fresh florets from the store's produce section are perfect, but frozen works in a pinch (thaw and drain well). I always grab Trader Joe's frozen broccoli when I'm short on time—it's pre-cut and ready to go. The cheese makes or breaks the crispy top—a blend of mozzarella and cheddar melts better than just one type. Panko breadcrumbs give that satisfying crunch, but regular breadcrumbs toasted in the oven work too if you're out.
No panko? Crushed cornflakes or crushed potato chips add crunch without the extra cost. Short on parsley? Fresh chives or cilantro work just as well for garnish. The eggs are non-negotiable though—they're what binds everything together. If you're worried about soggy cups, bake them at 375°F for the full 20 minutes until golden. For extra flavor, toss the broccoli with a pinch of salt and pepper before mixing it into the rice—it makes a huge difference. And if you've got leftover rice, this is the perfect way to use it up.
These cups reheat beautifully—just pop them in the oven at 350°F for 5-7 minutes until warm. Store leftovers in an airtight container for 4 days in the fridge or freeze for 2 months. I always make a double batch because they disappear fast—pack them for lunches or serve as a snack. The secret to crispy tops? Don't skip the egg wash on the breadcrumbs before baking. Trust me on this one.
Why You'll Love This Recipe
- Minimal Chopping Required: I swear by this—just dice the broccoli into florets (no fancy prep), mix it with cooked rice, and you’re halfway there. The panko topping adds crunch without extra effort, and honestly? My kids think they’re making "fancy food" when it’s just me cutting veggies.
- Cheesy Crispy Magic: That moment when the panko turns golden and the cheese melts into a gooey blanket over fluffy rice? Ridiculously good. The eggs bind it all together, but the broccoli keeps it fresh—no soggy bites here, just that perfect texture contrast.
- Lunchbox Hero: Between us, these are my go-to for meal prep. Assemble them ahead, refrigerate overnight, and reheat in the microwave—still holds shape, still tastes like a homemade meal. My daughter packs two in her lunchbox every time (yes, even on a Tuesday).
- Pantry Staples Only: No weird ingredients here—just rice, cheese, and eggs you already have. Broccoli’s the only fresh thing, and you can use frozen if you’re in a pinch. I’ve made these on grocery-store cheese and basic panko, and they’re still solid. Budget-friendly doesn’t mean boring.
Step-by-step instructions for broccoli rice cups
Here's how to assemble these crispy-topped bites—perfect for meal prep and snacking.
Cook the Rice and Broccoli Mixture
In a medium saucepan, melt the 1 tablespoon butter over medium heat. Add the 1 cup white rice and toast for 2 minutes, stirring constantly, until the grains become slightly translucent and fragrant. This step prevents mushy rice later.
Pour in the 0.5 cup vegetable broth and bring to a boil. Once boiling, reduce heat to low, cover, and simmer for 15 minutes until all liquid is absorbed. Remove from heat and let it steam, covered, for 5 more minutes. Meanwhile, steam the 2 cups broccoli florets in a separate pot for 3-4 minutes until bright green and tender-crisp. Drain well and chop into small pieces.
Mix the Filling and Prepare the Cups
In a large bowl, combine the cooked rice, chopped broccoli, 2 cloves minced garlic, 0.5 teaspoon salt, and 0.25 teaspoon black pepper. Stir in the 2 whole eggs and mix until fully incorporated—this creates a cohesive filling. The mixture should hold together when pressed gently.
Lightly grease a 24-cup muffin tin with 0.25 cup olive oil (use a paper towel to apply). Divide the filling evenly among the cups, pressing down lightly. The cups should be filled about ¾ full—don't overfill or the cheese topping will spill during baking.
Add the Cheese and Breadcrumbs
Sprinkle 1.5 cups shredded cheese evenly over each cup, pressing down lightly to ensure contact with the filling. This step is crucial for that gooey, melty texture we're after. Top each with 1 tablespoon panko breadcrumbs—this creates the crispy crust that makes these cups irresistible.
Here's the thing—don't skip pressing the cheese down. If it sits on top without making contact, you'll end up with dry, crumbly bites instead of the perfect blend of textures. A quick press with your finger ensures every bite delivers that melty cheese experience.
Bake to Golden Perfection
Preheat your oven to 375°F. Bake the cups for 20-22 minutes until the edges are deep golden brown and the cheese has melted completely. The breadcrumbs should be crispy, not just dry—this is your crispy promise delivered.
If you notice the tops browning too quickly before the centers are set, tent the muffin tin with foil for the last 5 minutes of baking. This prevents burning while still achieving that perfect crispy texture. Let the cups cool in the pan for 5 minutes before transferring to a wire rack.
Garnish and Serve
While still warm, sprinkle the tops with 0.25 cup chopped fresh parsley for a pop of color and freshness. The parsley not only looks beautiful but also adds a bright contrast to the rich, cheesy flavors. Serve immediately for the best texture, or store in an airtight container in the refrigerator for up to 4 days.
These crispy-topped bites are perfect for meal prep—they reheat beautifully in the microwave for 30-45 seconds (cover with a damp paper towel to prevent drying). The contrast of crispy breadcrumbs, creamy cheese, and tender rice makes every bite satisfying. Enjoy them as a snack, appetizer, or even a light lunch!
Pro Tips For Making Broccoli Rice Cups
- USE COLD RICE: I learned this the hard way—warm rice turns into mush when mixed with eggs and cheese. Chill your cooked rice completely before forming cups, then refrigerate for 10 minutes. The starch sets up better, so the cups hold shape and don’t fall apart when baking.
- STEAM BROCCOLI FIRST: Overcooked broccoli gets soggy and dull. Steam florets just until bright green and still crisp (about 3-4 minutes), then shock in ice water to stop cooking. Drain well—wet florets make the rice mixture gloppy when mixed.
- PRESS HARD ON CUPS: Skip the gentle pressing, and really pack those rice mixtures into the muffin tin. I used to tap lightly, but firm pressure (like pressing a snowball) ensures the cups stay intact during baking. Use your thumb or a spoon—no need for fancy tools.
- BAKE IN STAGES: Start broccoli rice cups at 375°F (190°C) until the edges set (about 12 minutes), then crank to 400°F (200°C) for the last 8-10 minutes. The lower heat locks in moisture first, while the finish gives that golden crust on top—no burnt cheese or dry rice here.
Storing and reheating this broccoli rice cups
Fridge Storage Secrets
Store your broccoli rice cups in an airtight container with parchment paper between layers to prevent sticking. They stay fresh for 4 days in the fridge—just pop them in the oven at 350°F for 5-7 minutes to reheat.
I always make a double batch because they vanish faster than you can say "crispy top." 🌟
Freezer-Friendly Tips
For long-term storage, freeze the cups in a single layer on a baking sheet first to prevent clumping. Once frozen, transfer to ziplock bags or airtight containers for up to 2 months. Thaw overnight in the fridge before reheating—this preserves that perfect crispy texture. 🧊
Microwave Revival
Need a quick fix? Microwave individual cups on high for 30-45 seconds, covered with a damp paper towel. The steam keeps them moist while the cheese stays melty. If they look dry, add a splash of water or broth and reheat for another 10 seconds.
Oven Reheating
For the best results, reheat directly from the fridge at 350°F for 8-10 minutes until the breadcrumbs are crispy again. Place them on a baking sheet to catch any cheese drips. This method restores that fresh-from-the-oven crunch you love. 🔥
Crispy Top Rescue
If your reheated cups lose their crunch, broil them for 1-2 minutes at the end of reheating. Watch closely—they burn faster than you think! A quick broil revives that golden, crispy texture in seconds. Just don’t walk away!
Nutrition facts
Frequently asked questions
Can I use cauliflower instead of broccoli in these cups?
Cauliflower works beautifully and adds a slightly different texture. For best results, steam or microwave it until tender-crisp (about 4-5 minutes for frozen) and chop finely. The flavor is milder, so consider adding a pinch of garlic powder or lemon zest to brighten it up.
Why did my broccoli rice cups turn out soggy instead of crispy?
Soggy cups usually happen when the cheese doesn't melt properly or the breadcrumbs get too moist. First, make sure your cheese is pressed down firmly to touch the filling. Second, bake at 375°F for the full 20-22 minutes—don't cut time short. For extra crispiness, try brushing the breadcrumbs with a little beaten egg before baking.
How many cups does this recipe make?
This recipe fills a standard 24-cup muffin tin about ¾ full, so you'll get approximately 20-22 individual cups. Perfect for meal prep! If you want smaller portions, use a 36-cup tin and fill each ½ full. The key is not overfilling—the cheese topping needs room to spread.
Can I make these cups ahead of time?
Yes! These are ideal for prep. Assemble the cups and refrigerate them (unbaked) for up to 24 hours before baking. For baked cups, store in an airtight container for 4 days or freeze for 2 months. The texture stays best when reheated properly—either in the oven or with a quick broil to restore crispiness.
What's the best way to make them vegan?
Swap the eggs for 2 tablespoons flaxseed meal mixed with 6 tablespoons water (let sit for 5 minutes to thicken). Use vegan cheese or nutritional yeast for the topping, and ensure your breadcrumbs are egg-free. For extra binding, add 1 tablespoon tapioca starch to the rice mixture. The texture will be slightly different but still delicious!